

How to Enlarge Loft Hatch Safely
- rickshomeimproveme2
- Jun 16
- 6 min read
A loft hatch that only just lets a cardboard box through soon becomes a daily annoyance. If you are looking up how to enlarge loft hatch openings, chances are the loft itself is fine, but getting in and out safely is the real problem.
A bigger hatch can make a huge difference. It gives you better access for storage, makes a loft ladder more practical, and can turn wasted roof space into something you will actually use. But it is not simply a case of cutting a bigger hole in the ceiling and hoping for the best. The structure around the opening matters, insulation matters, and the finish matters if you want it to look tidy and work properly.
How to enlarge loft hatch without causing problems
The first thing to understand is that some loft hatches are straightforward to enlarge, while others need a more careful approach. It depends on where the existing opening sits in relation to the joists, whether there are cables nearby, and what sort of hatch and frame you want to fit afterwards.
In many homes, the current hatch sits between ceiling joists. If your new opening can still work within those joist positions, the job is often simpler. If the hatch needs to be widened across joists, you are moving into structural alteration territory. That does not always mean a major project, but it does mean the opening has to be properly trimmed and supported.
This is where homeowners sometimes get caught out. The plasterboard is easy enough to cut. The timber support around it is the part that needs to be done properly.
Check the loft before you plan the new opening
Before any cutting starts, get into the loft and look at the area around the hatch. You are checking for three main things: joist direction, obstructions, and clear landing space.
Joist direction tells you how flexible the opening size might be. If the joists run along the width you want to enlarge, the work is more involved. Obstructions can include electrical cables, pipework, extractor ducting, downlights or alarm wiring. Clear landing space matters because there is little point fitting a larger hatch if there is nowhere safe to step, no boarding nearby, or not enough headroom to use a ladder comfortably.
If the loft is insulated to modern depth, you also need to think about how the hatch will be sealed and draught-proofed afterwards. A larger opening that leaks heat is a step backwards.
Picking the right loft hatch size
A lot of older hatches are too small for modern use. They may be enough for a quick look into the loft, but not ideal for regular storage access. Enlarging the opening usually makes sense if you want to carry boxes up safely or fit a proper loft ladder.
A common target is a hatch size that allows easier shoulder-width access while still fitting neatly between or around the existing timbers. The best size is not always the biggest one possible. It needs to suit the loft ladder, the available ceiling space, and the structure above.
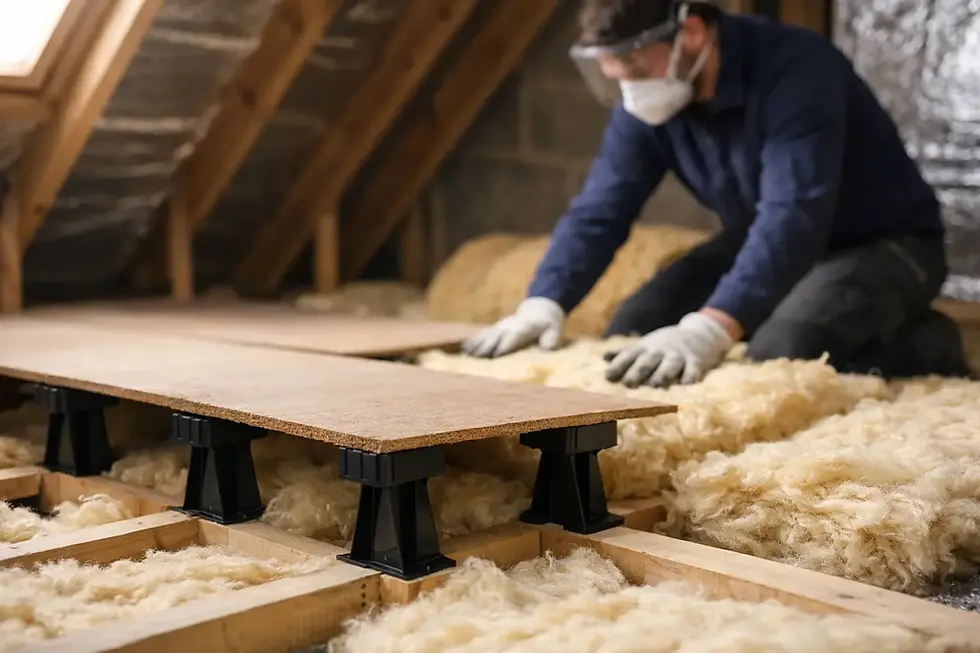
For new-build homes, there is another consideration. The loft should not become a place where insulation is crushed or ventilation is blocked just because access has been improved. Better access works best when it is paired with proper raised boarding and a hatch system that keeps thermal performance in mind.
When enlarging a hatch is worth it
It is usually worth doing if your current hatch is awkward, the lid is flimsy, or you avoid using the loft because access feels unsafe. It also makes sense if you are already planning other work such as loft boarding, added insulation, lighting or a folding ladder.
Doing everything together often gives a cleaner result. The hatch opening can be sized correctly, the ladder matched to it, and the landing area in the loft can be made safe at the same time.
The basic process for enlarging a loft hatch
The exact method varies from house to house, but the general sequence is fairly consistent.
First, the new opening is measured and marked carefully from below and above if possible. The area is checked for joists, pipes and cables. Dust sheets go down because plasterboard cutting is messy work however careful you are.
Next, the ceiling opening is cut back to the new size. If the enlarged hatch stays within the existing joist spacing, the timber frame can often be adjusted or replaced to suit the new hatch. If a joist needs to be cut, new trimmers are fitted to transfer the load correctly. That is the part that should never be guessed.
Once the structure is right, the new hatch frame is fitted square and level. After that comes the hatch door itself, the architrave or trim, and any ladder system if one is being installed. Finally, the opening should be insulated and draught-sealed properly so the hatch is practical as well as neat.
A professional finish is not only about appearance. A hatch that closes flush, does not rattle, and does not let warm air escape is a much better long-term result.
Common mistakes when people try it themselves
The biggest mistake is assuming all loft hatch enlargements are cosmetic. They are not. Even if the ceiling cut is small, the timbers around it are doing a job.
Another common issue is choosing a hatch size before checking the loft ladder requirements. Some ladders need more swing space, more loft clearance, or a specific opening length. Homeowners sometimes fit the hatch first, then find the ladder they want will not work with it.
Poor sealing is another one. A larger opening with a thin, ill-fitting drop-down panel can create draughts and heat loss. That matters even more in homes where insulation has already been upgraded.
Then there is the finish. Cracked plaster edges, uneven trim and badly aligned hatch doors can make a simple improvement look bodged. That may not sound serious, but if the hatch sits on a landing ceiling, it is one of those details you notice every day.
Costs and what affects them
The price to enlarge a loft hatch depends on the size of the alteration, the condition of the existing opening, and whether extra work is being done at the same time. A straightforward enlargement with a new hatch and tidy finish is one thing. Adding structural trimming, a loft ladder, boarding near the access point, or upgraded insulation will raise the cost.
Ceiling type matters too. Some older properties have trickier lath and plaster ceilings rather than modern plasterboard, and that can make the job slower and messier. Access below the hatch also affects the work. A hatch over a tight staircase can need more care than one in a clear landing ceiling.
The sensible approach is to look at the hatch as part of the whole access setup, not as a standalone hole in the ceiling. If the goal is better storage, the hatch should support that properly.
Should you do it yourself or call a specialist?
If the opening is being enlarged only slightly, there are no cables or pipes nearby, and the new hatch fits within existing joists, a confident DIYer may be able to handle it. That said, neatness and safety still matter, and many people would rather not risk damaging their ceiling for the sake of saving a bit of money.
If the joists need altering, if you want a folding ladder fitted, or if the loft is part of a wider storage upgrade, using a specialist is usually the better route. The work gets planned properly, the opening is finished cleanly, and the hatch can be matched to the insulation and boarding layout.
For homeowners around Doncaster, this is often where a loft access specialist adds real value. Instead of treating the hatch in isolation, the job can be done as part of a safe, usable loft setup that actually improves the house.
How to enlarge loft hatch and still protect insulation
This point gets missed more often than it should. Better loft access should not come at the cost of poorer energy performance.
If your loft has been topped up with deep insulation, the hatch needs to be fitted in a way that limits heat loss and avoids compressing insulation around the access point. If you are planning to board the loft too, raised systems are usually the right answer because they preserve insulation depth instead of flattening it under chipboard.
That is especially relevant in newer homes, where loft work should be done with care to avoid causing ventilation or compliance issues. A wider hatch can be a very worthwhile upgrade, but it needs to sit within a sensible overall plan.
Doncaster Loft Boarding Solutions deals with this kind of work regularly because access, insulation and storage all affect each other. Done right, a larger hatch makes the loft easier to use without undoing the benefits of proper insulation.
If your current hatch is small, awkward or simply not fit for purpose, it is worth looking at the job properly rather than patching around it. A well-sized hatch, fitted neatly and planned with the loft as a whole in mind, can make the space above your ceiling far more useful than most people expect.


Comments